Wednesday, December 22, 2010

Two Combined PV and Solar Heating Systems

Solar electric systems operate at about 15% efficiency -- the remaining 85% is mostly turned into heat, which is wasted on nearly all current PV systems.  The heat is not only wasted, but it causes the PV panels to run hotter, which lowers their efficiency.

There have been a number of attempts to try to harvest the waste heat that PV arrays produce for space or water heating -- here are a couple fairly recent additions.

PVT Solar's Echo System
This system is a combined PV and solar thermal system.  Conventional PV panels are spaced a few inches  above the roof plane leaving a space between the roof and the bottom of the PV panels.  The top and sides of the PV array are closed off so that the only opening for airflow is along the bottom of the PV array.  Fresh air is drawn in under the PV panels along the open bottom edge, and is heated as it progresses up between the hot PV panels and the roof.  Vents through the roof at the top of the array take the heated air into the house and use the heated air to heat domestic water and/or for space heating. 

Heat from the cavity formed under the sealed PV panels is collected and used for space and water heating.
From a thermal point of view, the system is basically an unglazed collector that takes in ambient air and heats it all the way up to temperatures good for space heating (most solar heating systems get a head start by heating room temp air up).  I would think that this system might work well in some climates, but the combination of unglazed collectors and heating all the way from ambient would seem to limit its use in cold climates?  The SRCC report (link below) would seem to confirm this if it is for the same system -- the efficiency curve intercept is 0.24.

The PVT Solar concept  is a very simple, and could certainly be implemented on a DIY basis.   While the thermal performance is likely to be well under a good dedicated thermal collectors, the extra "free" thermal energy would likely be more than the electrical energy the PV array generates.

I would love to hear from anyone who has one of these systems, or know more about them.

More details and links on the PVTSolar system...

Solar Wall PV/T
This is a variation on SolarWall's well know transpired solar air heating collector system.  In this version, PV panels are spaced over Solar Wall's transpired solar thermal collector absorbers.  The SolarWall collectors draw in the heated air behind the PV panels.

The PV panels sit over the standard Solar Wall transpired air heating collectors


It would be interesting to know how the thermal efficiency of this PV version of the Solar Wall compares to a regular Solar Wall.  I would think the addition of the PV panels may reduce the thermal efficiency of the SolarWall because PV panels would not be as efficient an absorber as the SolarWall absorber they are shading?

I did not see any detailed performance numbers on their site.

More details and links on the Solar Wall PV/T product ...

It will be interesting to see whether these products do well.

Gary

Saturday, December 18, 2010

Super Insulated Stock Tank

This is a really nice and simple design from Scott for a well insulated stock tank for horses or other livestock.

It is basically a tank within a tank with the space between filled with insulation.

This shows the two tanks Scott used.  The inner tank is a commercially available heated bucket, so with Scott's design there is no need to have a drop in the tank type heater -- the heater is built into the bucket.

Adding insulation between the two tanks -- see the full story for how best to do this.

And, this is the finished tank.


Scott uses a KillAWatt meter to measure tank heater electricity consumption, and has seen a 61% in heater energy consumption.  A drop from about 6.3 KWH per day down to 2.5 KWH per day!

All the details on building Scott's insulated stock tank...

Details on several other DIY solar and insulated stock tank projects...


Thanks very much to Scott for sending this in!

Gary

Monday, November 29, 2010

Effect of Partial Snow Cover on PV Panel Output

This is a quick test to see how much a thin layer of snow covering a part of a PV panel effects the output.

In other words, should you bother to clean off the PV panels when they are only partly covered by a light snow?

We had a snowstorm yesterday that covered all the panels with about an inch of snow.  By mid morning today, the tops had cleared off, but the bottoms still had the inch of snow.

I was curious how much this affected the output, so I cleared off 5 of the panels and left the other 5 with the snow on them.  Like this:

Half of panels cleared, half with partial snow cover.

  The effect of power output is shown below:

The effect is pretty dramatic, the panels that were cleared of snow are producing nearly ten times as much power as the uncleared panels.

So, I guess the moral is -- get out there and clean off those panels!

All the details on this test here...

All the details on the PV system here...

Gary


Note - the reason that the panel report above does not show the 5 cleared panels on the left and the 5 snow covered panels on the right is that apparently the panel map I turned into Enphase had some panels in the wrong position -- have to send them a new map.

Effect of Partial Snow Cover on PV Panel Output

This is a quick test to see how much a thin layer of snow covering a part of a PV panel effects the output.

In other words, should you bother to get out there and clean off the PV panels when they are only partly covered by a light snow?

We had a snowstorm yesterday that covered all the panels with about an inch of snow.  By mid morning today, the tops had cleared off, but the bottoms still had the inch of snow.

I was curious how much this affected the output, so I cleared off 5 of the panels and left the other 5 with the snow on them.  Like this:

Half of panels cleared, half with partial snow cover.

  The effect of power output is shown below:

The effect is pretty dramatic, the panels that were cleared of snow are producing nearly ten times as much power as the uncleared panels. 

While its certainly true that only a small amount of shading can cut a PV panels output considerably, I was a bit surprised by this in that snow lets a lot of light through.

So, I guess the moral is -- get out there and clean off those panels!

All the details on this test here...

All the details on the PV system here...

Gary


Note - the reason that the panel report above does not show the 5 cleared panels on the left and the 5 snow covered panels on the right is that apparently the panel map I turned into Enphase had some panels in the wrong position -- have to send them a new map.

Tuesday, November 23, 2010

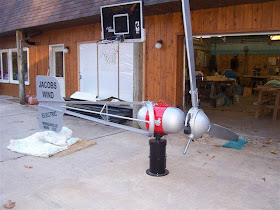
Tom's New/Old Wind Turbine AND Other Solar Projects!

For those who have been following Tom Sullivan's wind turbine project, Tom has made a major change.

He has replaced his Breezy wind turbine with this beautiful, restored 1930's Jacobs wind turbine.  Tom replaced the Breezy because it was not proving to be a good match for the wind speeds at his site.  The Jacobs starts up at much lower speeds, and is doing quite well. 
 
For Tom's more detailed explanation on the replacement...

For more details on the Jacobs conversion on Tom's site...  (very interesting)


If you have not seen the story on Tom's self built 140 ft tilt up tower and the original turbine installation, its an amazing DIY project...


Tom got involved in renewable energy projects several years ago when he built a large solar air heating collector for his hanger.   He has since done several very well designed and built solar projects for heating his home, domestic hot water, and hot tub.   He wrote up several of these projects for Build-It-Solar, and there is much to learn from them

Tom's projects on Build-It-Solar...

He got so involved in solar projects that he has started a business to make aluminum heat absorber  fins for solar water heating collectors.  Tom's fins are very well made and efficient, and they save the labor of making your own fins for collectors.   Tom has a new website that provides details on a number of solar projects that he and his customers/friends have done as well as ordering info on the fins.

This just goes to show how solar can suck you in!

Tom's website ...


Gary  November 23, 2010

Friday, November 12, 2010

The Dual-Flush Toilet Project Update

A while back, we replaced all of our toilets with dual-flush units in order to save some water.


We used WaterRidge dual-flush toilets purchased from our local Costco.  At the time, dual-flush toilets commanded some very high prices, and finding them at Costco for less than $200 seemed like quite find.

Our fist WaterRidge dual-flush toilet.

They have steadily been coming down in price, and the last time I was in Costco, they were selling the same model for $60 -- Amazing!  So, if you have been holding off, now is the time.

Anyway, we have replaced all the toilets in the house with the new dual flush WaterRidge units, and the oldest one has been in service for about 3 years.  No problems of any kind with any of them.

All the details on the install, and our experiences to date on the dual flush toilets...

Gary

Sunday, November 7, 2010

A Report on Our PV System After One Full Year of Operation

Its been one year since we put in our PV system, so I thought I would do a little report on how its performed, and what living with the system has been like.

The system is ten 215 watt panels and uses the Enphase  micro-inverters with each panel getting its own grid-tied inverter.

Our ten panel, 2150 watt micro-inverter PV system.
In a nutsehll:
  • The system has been trouble free -- no repairs or problems.
  • The maintenance has been very minimal -- wash the dust off once in a while, brush off the snow, inspect the system for problems.
  • Performance has been about 8% above the PVWatts estimate for the year
The system produced 3320 KWH for the year -- about 8% more than PVWatts going in estimate.

Building the mounts and installing the PV panels.

Its interesting (maybe) to note that when we moved into the house our power consumption was up at around 1000 KWH per month -- near the US average.  We pursed a bunch of conservation and efficiency measures which got our usage down to right around 500 KWH per month.  All these changes are spelled out here in our Half Program.  The cost of all the conservation measures was about $1,200 dollars. 

We then added the PV system, which generates about 275 KWH per month, and takes our net consumption down toward 200 KWH per month.  The PV system cost us about $10,000 ($6,500 after rebates).  So, for us, the conservation measures were about ten times more cost effective in saving electricity than the PV system.
The message is do the conservation stuff first -- after you've gotten your consumption down, then think about a PV system to work on the remaining usage.  This approach will save you a ton of money compared to just installing a PV system that is big enough to meet your current usage.

We are still working on conservation, and I think  we can get down to less than 100 KWH a month -- maybe even down to a net zero for the year.  A 100 KWH per month is a lot of electricity if used carefully -- as any off-grider will tell you.

More details on the first year of use experiences...
(Including how solar thermal DIY systems compare to solar PV DIY systems)

Full "how to" on planning and installing our grid-tie system...

Lots more on building your own PV system...


Gary

Would Wide Solar Collectors Work Better With Horizontal "Risers"?

DIYers will often build collectors that are quite wide (20+ ft) for solar space heating.  The usual approach is to run a manifold along the top and bottom of the collector, and then connect the two manifolds with closely spaced risers that have fins attached to capture the sun's heat  and transfer it into the water flowing through the risers.


It has been suggested by Alan Rushforth that it would save material and might also result in a more uniform water distribution to the risers if they were run horizontally instead of vertically.  You end up with a much smaller number of much longer risers (hisers?).   This reduces manifold material, and reduces the number of manifold to riser joints -- these joints are time consuming and expensive, so reducing the number of them would be a good gain.

In order to push this idea along a little further, I did a test by turning my old prototype copper tube/aluminum fin collector on its side so that the risers run horizontally and the manifolds are vertical. 

In a nutshell, the test appears to show that at least for this small collector, the startup process, flow distribution, and drain back all work without problems -- I think it looks promising. 
What do you think?

All the details on the results here...


This idea has been discussed some in the Yahoo Simply Solar group and the Yahoo Solar Heat if you want to see a bit more on it -- these are both good groups for solar heating questions (and answers :).

Gary

Saturday, November 6, 2010

Performance Logging for Neil's UK Solar Water Heating System

Neil has been logging the performance of his very nicely done solar water heating system in the UK.

The collectors for Neil's system
As the plots show, the system performs well.  The plots also give a good view of how the tank thermally stratifies during during the day as the heat exchanger removes heat from the tank.

Performance for 1 day -- see link below for more
For:
- More details on performance of Neil's system...

- Construction details on Neil's system ...

- More examples of $1K style solar water heating systems...

- More on DIY solar water heating...

Gary

Thursday, November 4, 2010

Yellow Energy Labels for TVs

Starting in 2011 the FTC will require the yellow Energy Guide labels on new TV sets.
These are the same labels you now find in new dish washers, fridges, ...

The new Energy Guide label for TVs


I think this is a great development and will make it much easier for people who want to buy a low energy use and low carbon emissions TV to do so.

We recently went through the TV buying experience and found it to be very hard to get good data on how much power a given TV uses.  TV power consumption varies over a huge range and its large enough to have a significant effect on household power use.  I found the Energy Star label program for TVs to be very unhelpful -- I'd go so far as to say its misleading.  In contrast to the Energy Star labels, these Energy Guide  yellow labels give actual power consumption and should be very helpful.

If you are looking for a new TV, be sure to take energy use into account -- by looking carefully you can find a TV that performs very well and that uses substantially less power.

I'd like to see these Energy Guide labels on anything that uses more than a trivial amount of electricity -- I think that it would make it much easier for people to take energy use into account when buying.
A good next step would be to put them on those 24/7 power sucking TIVO  type units.

Gary

Tuesday, November 2, 2010

Large Solar Heating System Made From Surplus Shipping Container

Shawn shows in some detail how he uses a large surplus metal shipping container for general storage space and as a mounting structure for a large solar heating system.
This shows the collector bays mounted to the south side of the container.


Shawn mounted a large 9 bay solar water heating solar collector mounted directly to the south wall of the container.  Water is pumped through the collectors via an insulated buried pipeline that extends from the house to the container.  The heated water will be used for space heating in the house.

The homemade collector absorber plates being installed.

The collectors are homemade.  The collector absorbers use the copper tube and aluminum fin design that is used in our $1K solar system.  This is a closed loop system with antifreeze for freeze protection.

The system is described in some detail over several "Solar Projhects" entries in his blog...
The system is nearly complete -- it will be interesting to see how it performs.

Shawn's blog is the Green Gate Guest House -- this is quite an interesting ongoing story about converting a 1935 barn into a modern and energy efficient home.  Lots of entries on renewable energy projects, rain water harvesting, solar heating, ...

For lots more solar space heating systems...

Gary

Monday, November 1, 2010

Great DIY Websites -- Kris De Voecht's Solar Projects

This is another addition to the series on Great DIY Websites...

Kris's website covers the solar projects that he has tackled with good construction detail.

Kris's DIY collector design.
The projects cover solar space and water heating as well as a solar PV installation.

The thing that really sets Kris's projects apart is the very high level of workmanship that they show.  Everything Kris does is carefully thought out and built with great precision and care.  A good place to get inspiration for taking your workmanship up a notch.

Homemade heat storage tank and heat exchangers.

The website is in Dutch with some pages translated to English -- the Google Translation tool is your friend.

You have to look around a bit to find all the solar projects -- here are a few places to start:

Building solar collectors project - overview...
This page has a list of links to pages that detail the collector and storage construction.  The list is easy to miss -- its right under the "News and blog" entry.

Hot water storage...

The PV project...

Solar home in 1985...


Gary

Sunday, October 31, 2010

Great DIY Websites -- John Canivan's JC-Homes Website

This is part of the series on Great DIY Websites...
 
John Canivan JC-SolarHomes website is a good and extensive source of information for people who want to build solar heating projects.

The website has lots of articles that cover: solar collectors, solar heat storage, controls for solar systems, solar home design and lots of other renewable energy topics.  Lots of emphasis on how to build projects.

John and Richard Heiliger are the developers of the MTD (Modified Trickle Down) solar collector.


An MTD collector
John is also the founder of the very good Yahoo Solar Heat discussion group.  A good place to ask questions about (surprise) solar heating.

Gary

Wednesday, October 13, 2010

Great DIY Solar Web Sites -- Guy Marsden's ART TEC Website

I've started a new little section that provides links to some of my favorite DIY renewable energy websites.  All of these sites are the work of one individual, and they all show many innovative and practical ways to save energy and live a more sustainable life.

The first is Guy Marsden's ART-TEC website.

Guy is a multi-talented engineer and his extensive site covers many of his interests.
He has some very detailed how-to's that cover the design, building, and living with solar energy and energy conservation projects.  The projects include solar space heating, solar water heating, solar electricity, a solar lawn mower conversion, and quite a few conservation projects.  The projects are all carefully designed, and they all provide very detailed descriptions on how to build them.

Collectors for Guy's shop solar space heating system.


Guy and I have the same type of self installed micro-inverter PV systems, and we traded quite a few emails during the design and construction.  Since Guy was several months ahead of me on getting it built, most of the information flow benefited  me a lot more than Guy :)

The micro-inverter PV system being installed.

In addition to the energy related projects, Guy also does some beautiful artwork -- both furniture and some very innovative "paintings" from changing light patterns.

Cairo Sunset

The Home Page for Guy's site...


Gary

Saturday, October 9, 2010

Saying Goodbye to the Jelly Bean Car

We bought a Prius back in 2005, and I've been noting the experiences with it over the past few years here...

It picked up the name Jelly Bean car after listening to Click and Clack on Car Talk trying to talk someone into buying a Prius, and him coming back with "but it looks like a jelly bean!".

A couple weeks ago we traded it in on a new Jelly Bean:
Our new 2010 Jelly Bean

The old Prius had 101K miles on it and was still doing fine -- it will very likely go another 100K miles for its new owner.  But, we decided to take advantage of the slump in car sales and get a new one while the prices are down a bit.

The new one (they call it a generation 3), does have some nice refinements -- quieter, a little more roomy, a little more comfortable, better fuel economy, better performance, ...  Nothing dramatic, but small improvements that add up.  Hope this one serves us as well as the old one did.

Some more thoughts here...

Gary

Sunday, October 3, 2010

A Low Air Infiltration Pet Door

We had a blower door test recently, and one of the big air infiltration leaks in the house was our pet door.  The pet door leaked so badly that it had to be temporarily sealed off just to finish the blower door test.
This was a bit disappointing as we had paid extra for a double flap model that was supposed to provide good sealing.


While looking around for a good solution, I happened to read a blog on a new home that was being built in which they were enthused about the pet door they had installed.  It was a Freedom Pet Pass pet door, and in looking into it, it did seem like it might help with the air infiltration.

We ordered and installed one, and its been in use for couple months. We are quite happy with it.  It seals very well -- I cannot detect any air leakage even with a smoke pencil.   It also eliminates the problem we used to have with the flaps on the pet door banging noisily when it was windy.

The installation was a bit more involved than the other pet doors I've put in, but not that difficult, and the result is a near air leak free door.

The reason this door works better is the double magnetic seal that it employs.  It basically has one full magnetic seal for the dog going outside to inside direction, and a 2nd full magnetic seal for the dog going inside to outside.  This approach of using separate seals in each direction allows the use of face type magnetic seals with good contact area.

This shows the double magnetic seal arrangement.


View from the inside of the completed pet door.
The door does not include any "tunnel", so be prepared to frame in and trim the little tunnel through the wall.

While estimating energy saving for air infiltration improvements is very difficult, I had a very rough go at it and came up with about $30 per year in propane savings for our case.

Gary

Monday, September 27, 2010

Our Solar Heated Stock Tank In Mother Earth News!

The new issue of Mother Earth News (October 2010) has a full article on the solar heated stock tank we built for our neighbor's horses.

Lori and Kevin commissioning the new Solar Stock Tank

In cold climates, keeping the water in livestock tanks from turning into a solid block of ice can be a real challenge.  One common solution is to use an electric stock tank heater -- this works, but the down side is that with the typical uninsulated metal stock tanks the heat loss and energy uses are huge.  In our climate during cold weather, you can easily spend $3 a day in electricity just keeping a tank ice free.

The insulated tank enclosure with south glazing.
The Solar Stock Tank design encloses an ordinary galvanized stock tank in a well insulated box.  The south face of the box is double glazed with impact resistant polycarbonate glazing.  The south wall of the stock tank is painted black and absorbs the solar radiation quite efficiently.  The insulation and double glazing reduce nighttime heat loss.   The tank can be used without a heater in all but the most extreme weather.
Lori, Darby, and Princess.
Its a pretty straight forward DIY build.  The energy savings can pay back the cost of the tank materials in as little as a couple months.  There is also a large saving in CO2 emissions associated with not using the electric heater.

The online version of the Mother Earth News article...

Very detailed information on the tank construction and performance ...

Other DIY solar and efficient stock tanks people have sent into Build-It-Solar...

If you know of other tank designs, please let me know.

Gary

CO2 Released When Making or Using Products

I've been looking around for a simple source of information on what the CO2 emissions associated with using certain materials are.
The CO2List.org site is the best I have found so far for providing this kind of information in a usable format.

They offer this table that summarizes CO2 emissions associated with many materials and activities...

Small sample from the table.
If you know of other good sources for this kind of information, please let me know.

More references and calculators on CO2 emissions and energy use for activities...
(e.g. -- did you know that the QE2 gets 0.0075 mpg?)


Gary

Friday, September 24, 2010

Sandy's $1K Solar Water Heating System On Prince Edward Island

Sandy describes in detail his new $1K style solar water heating system. 

The collectors mounted to side of house.
The collectors use a unique horizontal riser arrangement that makes better use of the copper tubing for horizontal layouts.   The collector mounting to the house is by a hook and eye arrangement that makes for minimal impact on the siding.

The tank heat exchanger PEX coil being wound on a form to
space the coils out for better heat transfer.

Very nice tank arrangement -- looks a lot better than mine :)
Note the small SwiftTech pump mounted on the side -- uses only 18 watts.
The tank is very nicely done, and might be a good model for people who will have tanks located where they are visible and need to look good.  Sandy uses a 300 ft coil of 3/4 inch PEX for the heat exchanger, and took the time to rewind the coil for better separation of the individual coils to improve heat transfer.

All the details on Sandy's Solar Water Heating System...

Lots more DIY solar water heating system plans and examples...

This solar water heater is a part of Sandy's overall plan to reduce energy consumption and CO2 emissions -- other parts include a new efficient boiler for space heating, upgraded insulation, a Prius, and more efficient appliances -- maybe we can talk Sandy into a report on how the whole program effects their energy use.

Gary

Monday, September 20, 2010

Philip's Fiji Island DIY Thermosyphon Solar Water Heater

Philip lives on the beautiful Pacific island of Fiji, where the scenery is stunning, but the utility rates are on the high side.
This picture just knocks me out -- wonder if Fiji needs another solar guy?
 
Philip worked out a nice and simple warm climate thermosyphon solar water heating system.    The system is very simple: no pumps, no heat exchangers, no differential controllers, no anti-freeze.   Just a PVC storage tank located above the collector, and the thermosyphon effect does all the rest.

The PVC solar heated water storage tank.


The thermosyphon collector.

The total cost was only $250 US.

Philip provides the details on how he designed and built the thermosyphon system...

Much more on DIY solar water heaters for climates from the Artic to Fiji...

 Gary  September 20, 2010

Thursday, September 16, 2010

A Large Solar Space and Water Heating System in Iowa

This is a very nicely done system by Thom that provides both solar domestic water heating and solar space heating.

The 200 sqft, homemade collector with twinwall glazing.
This is a drain back system with the 300 gallon heat storage and drain back tank located about 50 ft from the collectors in the house.  When the sun is off the collector and the circulation pump is not running, the water in the collector drains back to the tank in the house for freeze protection.

The collectors are modeled after the $1K Solar Water Heater design in which aluminum fins are thermally bonded to copper pipes.  This design provides 96% of the performance of commercial collectors at 1/5th the price.
Thom bonding collector fins to copper tubes.


The lines between the collector and the heat storage tank are run in a trench through the yard.  As the picture shows, the pipes are packaged up in XPS styrofoam insulation to reduce heat loss.

Insulated pipes going into the heat transfer trench.
The tank is an EPDM lined and well insulated plywood box.   It holds about 300 gallons.  While this kind of design may initially give you some pause, it is a well proven design that goes back to the 1980's and has a very good track record. 

Thom is using the system for both domestic water preheating and for space heating.  The domestic water preheat is accomplished by running the cold water supply through a 300 ft coil of PEX pipe that is immersed in the tank.  This is a very effective preheat system that is 100% efficient for most water demands, as the water in the pipe gets preheated to full tank temperature.  A 2nd copper pipe coil heat exchanger supplies water for space heating to a radiant floor.  Depending on the details of the plumbing, it may not be necessary to use the copper pipe coil -- some have just pumped hot water directly from the tank, through the radiant floor and them back to the tank.

The EPDM lined tank with the two heat exchanger coils.


 All in all, quite a nice system :)
Thanks to Thom for documenting it so well.


I feel a bit of a part of this system myself, as Thom and I exchanged a record number of emails during the project.  Its really nice to see it up and running :)

Thom experienced some start-up difficulties with the system, and I have to admire the way he handled working through these -- things don't always go smoothly, and after putting quite a bit of effort into building a system, it takes some real discipline to work your way through unexpected start-up problems.  Thom has done a good job of documenting these.

All the details on the system on Thom's website...

Similar systems on Build-It-Solar...

Gary

Sunday, September 12, 2010

Greg's Pop-Can Solar Air Heating Collector

Greg's solar air heating collector uses recycled aluminum soda pop cans for the absorber. The pop cans have the tops and bottoms drilled out, and are assembled into vertical columns that the air passes through. 
In operation, the black painted soda pop cans are heated by the sun, warming the air that is flowing up through the cans.

Greg's finished pop-can collector
 A manifold at the bottom evenly distributes room air to all the can columns, and a similar manifold at the top of the collector collects the heated air for distribution back to the room.
Lots of cans!


The combination of uniform air distribution to the whole collector and the large amount of heat transfer area from the cans to the air makes for an efficient collector. Greg's collector also uses Twinwall polycarbonate glazing -- this is a type of double glazing that reduces heat loss and increases the efficiency of the collector.

Detail of upper manifold.


 Greg sent in a very detailed (22 page) description of the full construction process with lots of pictures.

All the details on Greg's pop-can solar air heating collector here...

Thanks very much to Greg for documenting and sending in this project!

Lots more solar space heating projects here...

Gary

Saturday, September 11, 2010

Nicely Done Pipe Coil Style Solar Pool Heater in Tuscany

This is a nicely designed and carefully constructed solar pool heater for a swimming pool in Tuscany.


Quite a bit of detail is provided on the construction and the performance.  
The plumbing arrangement is particularly flexible.

The measured performance data indicate that the pipe coils achieve the same efficiency per square foot of area as conventional rubber mat style pool heating collectors.

I think that a trip to Tuscany to do field research on this is required :)

Closeup of one of the pipe coils.

The plumbing layout for the pipe coils.
Direct link to all the details on the Tuscany pool heater...
Thanks very much to Steve for suggesting this.

Quite a few other DIY Pool heating collector detailed descriptions...

The Build-It-Solar solar pool heating page...


Gary

Wednesday, September 8, 2010

Full Scale Test of Evapro/Radiation Cooling System

These are the results for the first full scale test of the Evapro/Radiation cooling system that I experimented a bit with last year.

This cooling scheme uses trickles of water down a surface that is pointed at the cold night sky.  The water trickling down the surface is cooled by a combination of radiation to the sky and evaporation of some of the water.  The cooled water is saved in a "coolth" storage tank for use on the next hot day.  For climates like ours which normally have cool nights even when the days are hot this works well.  Surfaces that are free to radiate to the night sky will cool significantly below ambient air temp, so the water can be cooled below the ambient air temperature.  

This full scale version uses the North roof surface of my Solar Shed as the cooling radiator to cool a 430 gallon tank of water during the night time.   When cooling is needed in the house during the following day, the cooled water in the tank is pumped over to the house and through the radiant floor heating loops in the house for cooling.
The solar heating side of the Solar Shed

 The same water storage tank and radiant floor loops that are used for heating in the winter can be used by this system for cooling in the summer with very little new work to be done.  Even the controls are unchanged except to switch from heat mode to cool mode.  So, you can basically add the cooling function for only a few dollars and a few hours of labor.

The cooling side of the Solar Shed in operation.
Normally this would be done  at night.
The picture above shows the Solar Shed in cooling mode.  Water from the "coolth" tank is distributed along the ridge line by a pipe with small holes.  It trickles down the roof surface, cooling it down in the process.  The cooled water is then collected by the gutter at the bottom, and routed back to the cooth tank.  Really simple, but the combination of cooling due to both radiation and evaporation is quite effective -- several times more efficient than conventional AC. 

We had such a cool summer here this year that I really did not have much motivation to get the full scale system set up, and only ended up with one hot day of testing.  But, I've received quite a few questions on the system, so I thought I would pass along the results from the one day test.  I plan to do more for next summer.

The link just below gives quite a bit of detail on how the test went, but the quick summary is that we were able to collect quite a bit of coolth in the tank efficiently, and that it kept our house comfortable through our one day (96F) heat wave.   The estimated COP of the system is about 22 (roughly SEER 75) -- several times more efficient than conventional air conditions. 

All the details on the full scale test of evpro/radiation cooling system... 

Gary